Installation Guide
This covers the entire installation process for setting a Ubuntu 22.04 PC with all JARVIS Modules. Some of this might be mentioned in other parts of the Manual or the Getting Started Guide. You do not necessarily need to use Ubuntu 22.04 as your OS of course, but everything is developed and tested in Ubuntu, so chances of everything working out of the box are the highest this way!
1. Setting up Linux
- Install Ubuntu 22.04 (you can use This Guide)
-
Install the Lambda Stack by openning a Terminal and running:
This installs all Nvidia Drivers and other important dependencies. To test the install run this after the reboot: The output should look like this: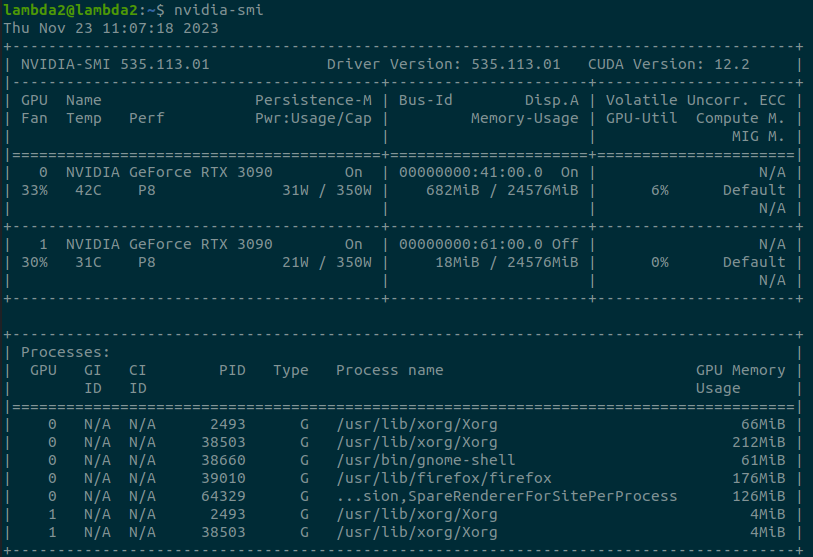
If there is an error like
Failed to comminicate with NVIDIA driver, disable secure boot in the BIOS. -
Install Miniconda by downloading the installer from here (Use
(If your installer is in yourMiniconda3 Linux 64-bit) and runnningDownloadsdirectory, make sure you also open your terminal in this directory) - Download FLIR Spinnaker (and Spinview) from their website (Use the Linux AMD 64-bit version). Complete the entire install, changing the udev-rules and USBFS size are also really important for Jarvis to work correctly. To install extract the downloaded archive to your home directory and from inside it run During the install you can always select yes if prompted. Restart the computer after the installation is complete for all the changes to take effect.
3. Setting up the AcquisitionTool
Installation
- Go to the Github Repos Releases Page and download the installer for your system from the most recent release
- Open a Terminal in the directory you downloaded the installer to and run Replace version with the one you downloaded of course!
- You should now be able to launch the AcquisitionTool by running
AcquisitionToolin a terminal from anywhere
Setting up USB Cameras
Check that that USBFS size is set correctly by running
This should return1000. There is no further setup required for USB Cameras
Setting up GigE Cameras and Network
Network Switch
The exact way to configure your network switch depends on the barnd and model.
Set MTU to ~9014
Network Setup on Computer
- Assign a fixed IP to all Ports on your Network Interface Card (NIC):
Settings -> Network -> Ethernet -> Gear Icon -> IPv4: - Set IPv4 Method to
Manual - Set Address to:
192.168.1.1(192.168.1.2 for the second port etc.) - Set Netmask to
255.255.255.0 - Setup Maximum Transfer Unit (
MTU) for all network ports: - Go to
system-connectionsdirectory using: - List all files in the directory using
ls, there should be one file per port with names likeWired connection 2.nmconnection - Edit each of those files by running (replace X with actual number):
- Below
[ethernet]add the following line: - After this reboot the computer and run this to check if it is configured correctly:
Network Setup on Cameras
For the first steps it is essential that the cameras are connected to a network with access to a DHCP server
- Open the Spinview Software (This step can **not be done with JARVIS)
- For each camera that has a red exclamation mark, right click on it and assign a new IP using
Auto Force IP - Now the camera should be accessible from SpinView, double click the first one to select it
- For each camera:
- Search for DHCP -> uncheck checkmark
- Search for Current IP configuration persistent IP -> set checkmark
- Search for Persistent IP Address -> set to available address, e.g
192.168.1.2(make sure this matches the IP of your network ports) - Search for Persistent Subnet Mask ->
255.255.255.0 -
IP addresses need to be entered as plain integers, conversion works as follows for
192.168.1.2 -
Important: Connect the camera to their final Switch/Network now. For each Camera:
- Search for Packet and check that
Max. Packet Sizeis 9000 and setSCPS Packet Sizeto 9000. IfMax. Packet Sizeis smaller there is an issue with your network configuration, go back to the two previous steps and make sure everything is set up correctly.
Setting up the Arduino Trigger
- Clone the JARVIS-TriggerFirmware Repository using:
- Setup the udev rules to be able to connect to the Arduino by running:
- Navigate to the cloned Repository:
- Make sure your Arduino Uno is connected to one of the USB ports on your computer (a USB 2.0 port is sufficient here) and run
4. Setting up the AnnotationTool
- Go to the Github Repos Releases Page and download the installer for your system from the most recent release
- Open a Terminal in the directory you downloaded the installer to and run Replace version with the one you downloaded of course!
- You should now be able to launch the AcquisitionTool by running
AnnotationToolin a terminal from anywhere
5. Setting up the HyrbridNet Python Library
- Install git using:
- Clone the HybridNet GitHub Repository by running:
- Navigate to the downloaded Repo with:
- Create a
jarvisConda Environment by running: - Activate the environment by running:
- Make sure the right
SetupToolsversion is installed with: - Install the
jarvispackage with: -
You should now be able to run the jarvis Command-Line-Inerface (CLI) with:
You should see this in your terminal: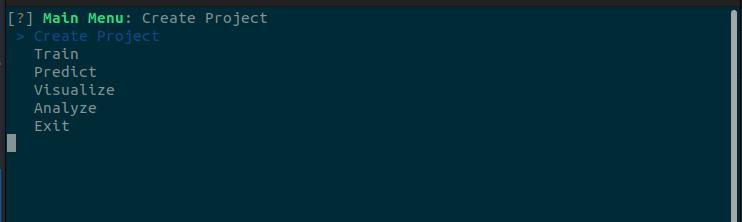
-
To update Jarvis run
from inside theJARVIS-HybridNetdirectory.